Mastering Agents: Build And Evaluate A Deep Research Agent with o3 and 4o

2025 has started with a bang. The arms race has begun with China entering the landscape and shaking up the order with their R1.
Now that frontier LLM play is getting harder; the wrapper value capture has begun - first with ChatGPT and now with Deep Research - an agent that can conduct comprehensive internet research in minutes instead of hours by sifting through lots of webpages. It is exciting to see these capabilities, but we believe the real value comes from understanding how to build and customize these systems for enterprise applications.
Rather than just being users of AI agents, let's roll up our sleeves and create our own research agent using o3-mini for generation and 4o for evaluation. By building one focused on financial research, we'll learn the core principles that power tools like deep research - from advanced reasoning and web browsing to synthesizing information from diverse sources.
We will develop an agent that can understand problems, make research plans, take action across multiple steps, and evaluate its findings. Think of it as looking under the hood of these new AI system patterns so we can adapt and improve them for our bespoke needs.
Get full example code - https://github.com/rungalileo/blog-examples

Requirements
Let's get started by installing these dependencies in a Python 3.11 environment with this command.
pip install --quiet langgraph==0.2.56 langchain-community==0.3.9 langchain-openai==0.2.11 tavily-python==0.5.0 promptquality==1.1.0
Signup on Tavily and OpenAI to generate an API key. Save the keys in a .env file as shown below.
OPENAI_API_KEY=KKK
TAVILY_API_KEY=KKK
Defining the problem
Our goal is to build a financial research agent which can go through multiple iterations of research to get the final answer. We’ll create a workflow that receives a question, breaks it down into granular questions, searches the web using Tavily, and analyzes the results. It then rechecks the output to create further plan. It does this a few times till the goal is achieved.
To analyze the results, we'll use the ReAct agent, which works with the Tavily API to think through and act on problems.
Define the ReAct agent
Within your IDE of choice, create a new Jupyter notebook agent.ipynb.
We will import a prebuilt ReAct agent along with web search tool called Tavily. While we'll use the same agent for all steps in this example, you could use different agents for different tasks. The best part? This can be further customized in later examples.
from langchain_openai import ChatOpenAI
from langchain_community.tools.tavily_search import TavilySearchResults
from langgraph.prebuilt import create_react_agent

system_prompt = "You are a helpful finance expert named Fred in year 2024. First of all you create a plan to get answer to the research query. Then you use tools to get answers to the questions. Finally you use the answers to each question in the plan to give your final verdict."

llm = ChatOpenAI(model="o3-mini")
tools = [TavilySearchResults(max_results=10)]
agent_executor = create_react_agent(llm, tools, state_modifier=system_prompt)
State management
Now let's talk about how our agent keeps track of everything it needs to do. Think of it like a smart to-do list system with three main parts.
First, we need a way to track what the agent plans to do. We'll use a simple list of steps written as text strings. This is like having a checklist of tasks the agent needs to complete.
Second, we want to remember what the agent has already done and what happened with each task. For this, we'll use a list of pairs (or tuples in programming terms). Each pair contains both the action taken and what resulted from that action.
Lastly, we need to store two more important pieces of information: the original question that was asked (the input) and the final answer once the agent finishes its work (the response).
This setup gives our agent everything it needs to work effectively!
import operator
from pydantic import BaseModel, Field
from typing import Annotated, List, Tuple
from typing_extensions import TypedDict

class PlanExecute(TypedDict):
    input: str
    plan: List[str]
    past_steps: Annotated[List[Tuple], operator.add]
    response: str


class Plan(BaseModel):
    """Plan to follow in future"""

    steps: List[str] = Field(
        description="different steps to follow, should be in sorted order"
    )
Plan step
The planning step is where our agent will begin to tackle a research question. We'll use a special feature called function calling to create this plan. Let's break down how it works.
First, we create a template for how our agent should think. We tell it that it's a finance research agent working in October 2024, and its job is to break down big questions into smaller, manageable steps. This template, called planner_prompt, gives our agent clear instructions: create a simple, step-by-step plan where each step leads logically to the next, and make sure ano steps are missing or unnecessary. The final step should give us our answer.
The code sets this up by using ChatPromptTemplate, which has two main parts:
A system message that explains the agent's role and how it should plan
A placeholder for the messages we'll send it
from langchain_core.prompts import ChatPromptTemplate

planner_prompt = ChatPromptTemplate.from_messages(
    [
        (
            "system",
            """You are a finance research agent working in Oct 2024. For the given objective, come up with a simple step by step plan. \
This plan should involve individual tasks, that if executed correctly will yield the correct answer. Do not add any superfluous steps. The result of the final step should be the final answer. Make sure that each step has all the information needed - do not skip steps. At the end use the info collected to give the final answer to the main question containing the facts.""",
        ),
        ("placeholder", "{messages}"),
    ]
)
We then connect this template to ChatOpenAI using o3-mini. We take o3-mini being a decent reasoning tool calling model at low cost. The "structured output" part means the plan will come out in a specific format we can easily work with. You can also go ahead with any top model from our Agent Leaderboard ranking.

When we test it with a real question like "Should we invest in Tesla given the current situation of EV?", the agent will create a detailed plan for researching this investment decision. Each step will help gather the information needed to make an informed recommendation about Tesla stock based on the current electric vehicle market conditions.
Think of it like creating a research roadmap. We're giving our agent the tools and guidelines it needs to break down complex questions into manageable research tasks.
planner = planner_prompt | ChatOpenAI(
    model="o3-mini").with_structured_output(Plan)

planner.invoke(
    {
        "messages": [
            ("user", "Should we invest in Tesla given the current situation of EV?")
        ]
    }
)
Replan step
Think of re-planning as the agent's ability to adjust its strategy based on what it has already learned. This is similar to how we might revise our research approach after discovering new information. Let's break down how this works.
First, we create two types of possible actions the agent can take:
Response: When the agent has enough information to answer the user's question
Plan: When the agent needs to do more research to get a complete answer
The re-planning prompt is like giving our agent a structured way to think about what to do next. It looks at three things:
The original question (objective)
The initial plan it made
What steps have already been completed and what was learned
Using this information, the agent can decide to either:
Create new steps to gather more needed information
Give a final answer if it has enough information
The clever part is that the agent won't repeat steps it's already done. It focuses only on what still needs to be investigated. This makes the research process more efficient and prevents redundant work. It's like having a research assistant who can intelligently adjust their approach based on what they've already discovered.
This process helps our agent stay focused and efficient, only pursuing new information when needed and knowing when it's time to provide a final answer to the user.
We connect this re-planning ability to o3-mini as we expect it to be great at evaluation and planning.
from typing import Union


class Response(BaseModel):
    """Response to user."""

    response: str


class Act(BaseModel):
    """Action to perform."""

    action: Union[Response, Plan] = Field(
        description="Action to perform. If you want to respond to user, use Response. "
        "If you need to further use tools to get the answer, use Plan."
    )


replanner_prompt = ChatPromptTemplate.from_template(
    """For the given objective, come up with a simple step by step plan. \
This plan should involve individual tasks, that if executed correctly will yield the correct answer. Do not add any superfluous steps. \
The result of the final step should be the final answer. Make sure that each step has all the information needed - do not skip steps.

Your objective was this:
{input}

Your original plan was this:
{plan}

You have currently done the follow steps:
{past_steps}

Update your plan accordingly. If no more steps are needed and you can return to the user, then respond with that. Otherwise, fill out the plan. Only add steps to the plan that still NEED to be done. Do not return previously done steps as part of the plan."""
)


replanner = replanner_prompt | ChatOpenAI(
    model="o3-mini").with_structured_output(Act)
Define nodes
Think of this graph as a roadmap that shows how our agent moves from one task to another. We have three main functions that work together:
The execute_step function handles individual tasks. It takes the first item from our plan, formats it properly, and has the agent work on it. It's like giving a specific assignment to a research assistant and getting back their findings. The agent keeps track of what it did and what it learned.
The plan_step function is where everything begins. When given a question, it creates the initial research plan. This is like creating a first draft of how to tackle the problem.
The replan_step function is where the agent decides what to do next. After completing a task, it looks at what it has learned and either:
Creates new steps if more research is needed
Provides a final answer if it has enough information
Finally, we have the should_end function, which works like a checkpoint. It checks if we have a final answer ready. If we do, it ends the process. If not, it tells the agent to continue working.
from typing import Literal
from langgraph.graph import END


async def execute_step(state: PlanExecute):
    plan = state["plan"]
    plan_str = "\n".join(f"{i+1}. {step}" for i, step in enumerate(plan))
    task = plan[0]
    task_formatted = f"""For the following plan:
{plan_str}\n\nYou are tasked with executing step {1}, {task}."""
    agent_response = await agent_executor.ainvoke(
        {"messages": [("user", task_formatted)]}
    )
    return {
        "past_steps": [(task, agent_response["messages"][-1].content)],
    }


async def plan_step(state: PlanExecute):
    plan = await planner.ainvoke({"messages": [("user", state["input"])]})
    return {"plan": plan.steps}


async def replan_step(state: PlanExecute):
    output = await replanner.ainvoke(state)
    if isinstance(output.action, Response):
        return {"response": output.action.response}
    else:
        return {"plan": output.action.steps}


def should_end(state: PlanExecute):
    if "response" in state and state["response"]:
        return END
    else:
        return "agent"
Define workflow
We use StateGraph to create a map that guides our agent through its research journey via different actions it can take. Here's how it flows:
First, we create the basic structure of the workflow with its three main stops:
A planning station ("planner")
A research station ("agent")
A reviewing station ("replan")
Then we connect these stations in a logical order:
Everything starts at the planning station
From planning, the agent moves to doing research
After research, it goes to reviewing what it learned
At the reviewing station, the agent makes an important decision:
Either continue with more research if needed
Or finish up if it has a complete answer
This creates a smooth cycle where the agent can keep researching until it has everything it needs to answer the original question. It's like having a smart research assistant who knows when to dig deeper and when they've found enough information.
Finally, we compile this workflow into something we can easily use, just like any other tool in our system. This makes our research agent ready to tackle real questions and provide thorough, well-researched answers.
from langgraph.graph import StateGraph, START

workflow = StateGraph(PlanExecute)

# Add the plan node
workflow.add_node("planner", plan_step)

# Add the execution step
workflow.add_node("agent", execute_step)

# Add a replan node
workflow.add_node("replan", replan_step)

workflow.add_edge(START, "planner")

# From plan we go to agent
workflow.add_edge("planner", "agent")

# From agent, we replan
workflow.add_edge("agent", "replan")

workflow.add_conditional_edges(
    "replan",
    # Next, we pass in the function that will determine which node is called next.
    should_end,
    ["agent", END],
)

# Finally, we compile it!
# This compiles it into a LangChain Runnable,
# meaning you can use it as you would any other runnable
app = workflow.compile()
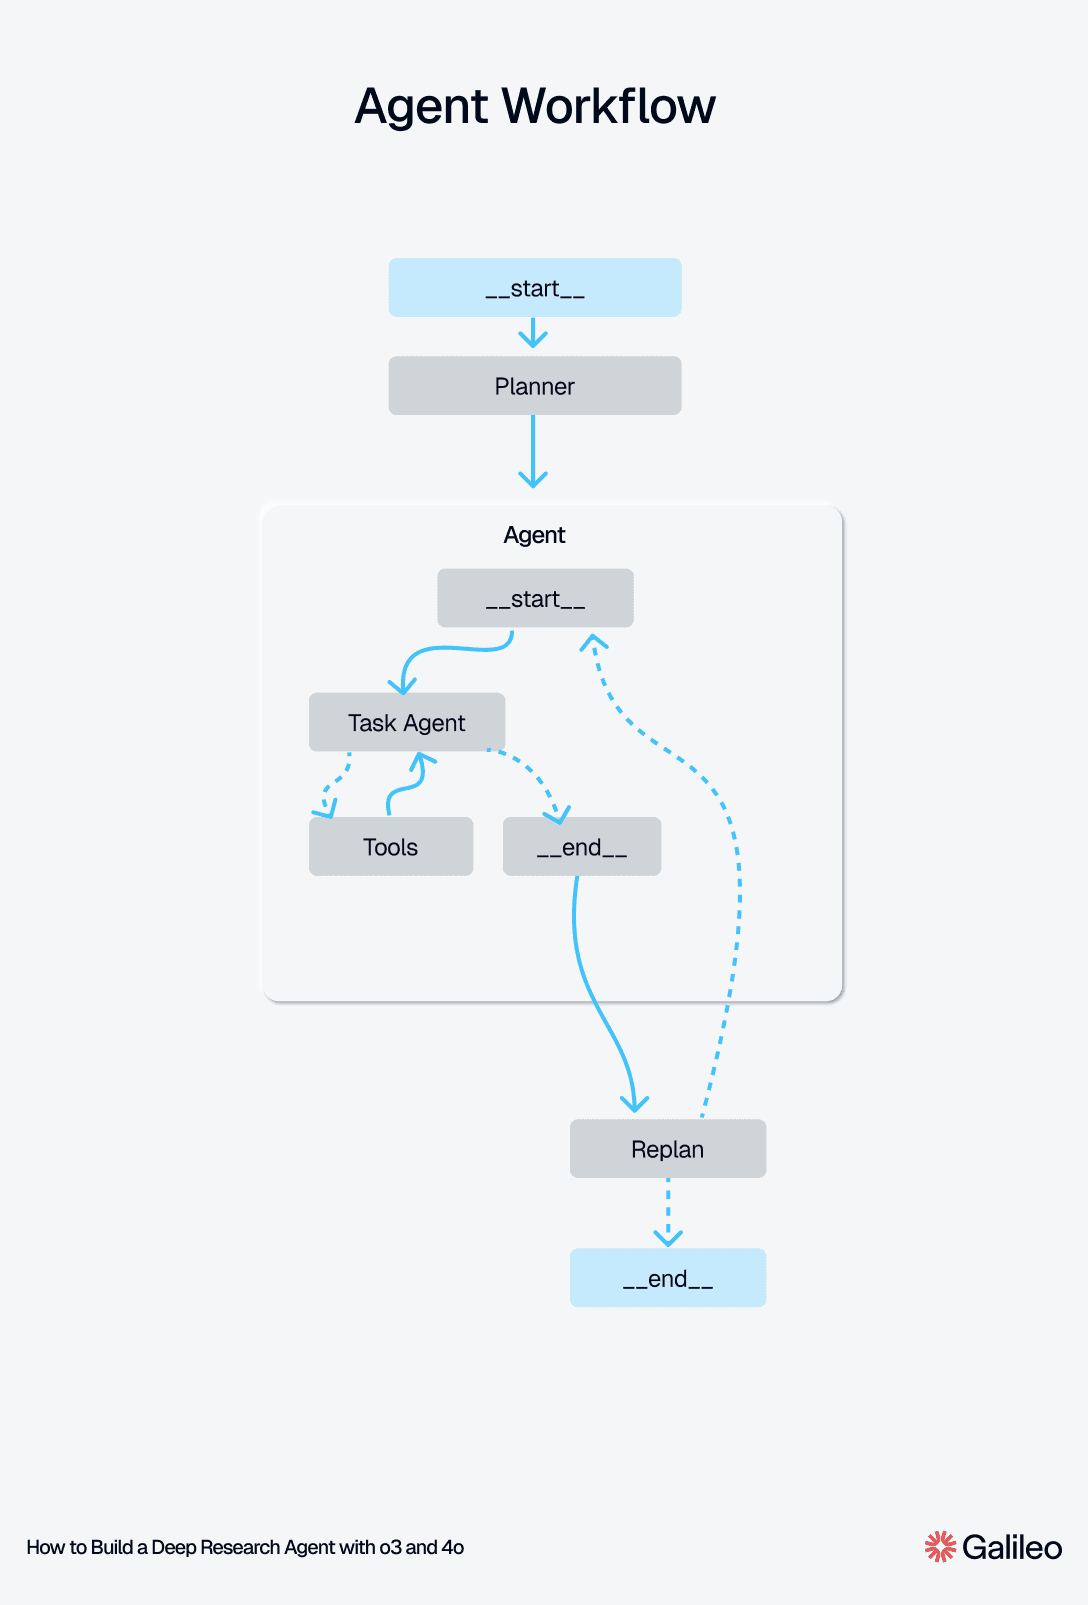
We can visualize the agent workflow with a mermaid diagram.
from IPython.display import Image, display

display(Image(app.get_graph(xray=True).draw_mermaid_png()))
We create a LLM judge to evaluate how well our agent performs. The inbuilt scorers make it super easy to setup one for us. We use gpt-4o as our LLM for the Tool Selection Quality and context adherence metric, with three evaluations per response to ensure great evaluation accuracy.
The tool selection quality metric is responsible checking if tool selection was necessary and if yes, then did LLM chose the righ arguments for the tool call. On the other side, context adherence scorer measures how well the agent sticks to the context and provides relevant information.
context_adherence_scorer = pq.CustomizedChainPollScorer(
                        scorer_name=pq.CustomizedScorerName.context_adherence_plus,
                        model_alias=pq.Models.gpt_4o,
                        num_judges=3)

tool_selection_scorer = pq.CustomizedChainPollScorer(
                scorer_name=pq.CustomizedScorerName.tool_selection_quality,
                model_alias=pq.Models.gpt_4o,
            )
We then set up Galileo evaluation callback that will track and record our agent's performance. It's like having a quality control system that monitors our research process.
With just few lines of code we will be able to get all the information needed to visualise and debug the traces.
evaluate_handler = pq.GalileoPromptCallback(project_name='deep-research-agent', run_name='v1', scorers=[pq.Scorers.tool_errors_plus, tool_selection_scorer, context_adherence_scorer])
We then run our agent with a specific test question. The system will process this question through our research workflow we built earlier.
The code is set up to show us what's happening at each step (that's what the async for loop does). It will print out each action and result as they happen, letting us watch the research process in real time.
Finally, we close out our evaluation session with evaluate_handler.finish(). This saves all the performance data we collected during the run to the Galileo Evaluate console so we can see the chain visualisation and the agent metrics.
Next, we set some basic config for our agent:
It can't go through more than 30 cycles (recursion_limit)
It must use our evaluation system (callbacks)
Now we are ready to run the experiment!
inputs = {"input": "Should we invest in Tesla given the current situation of EV?"}

config = {"recursion_limit": 40, "callbacks": [evaluate_handler]}

async for event in app.astream(inputs, config=config):
    for k, v in event.items():
        if k != "__end__":
            print(v)

evaluate_handler.finish()
Experiment results and metrics
We ran several experiments to evaluate our research agent's performance, and the results are quite revealing. Looking at our project dashboard, we can see how different test runs performed based on key metrics.
The standout performer was test-3, which earned the top rank with impressive results. It achieved a strong context adherence score of 0.844, meaning it stayed highly relevant to the research questions. What's particularly notable is its speed - completing tasks in just 84,039 milliseconds, making it the fastest among all runs. The agent processed three responses during this run, all while keeping costs low at $0.0025 per run.
The other test runs showed interesting variations in performance. Response times ranged from 134,000 to 228,000 milliseconds, and context adherence scores fell between 0.501 and 0.855. While some runs, like the initial test, produced more responses (up to 7), others generated just one. Cost efficiency remained consistent across all runs, staying between $0.002 and $0.004 per run.
These results give us valuable insights into our agent's capabilities and help us identify the most effective configuration for future research tasks.

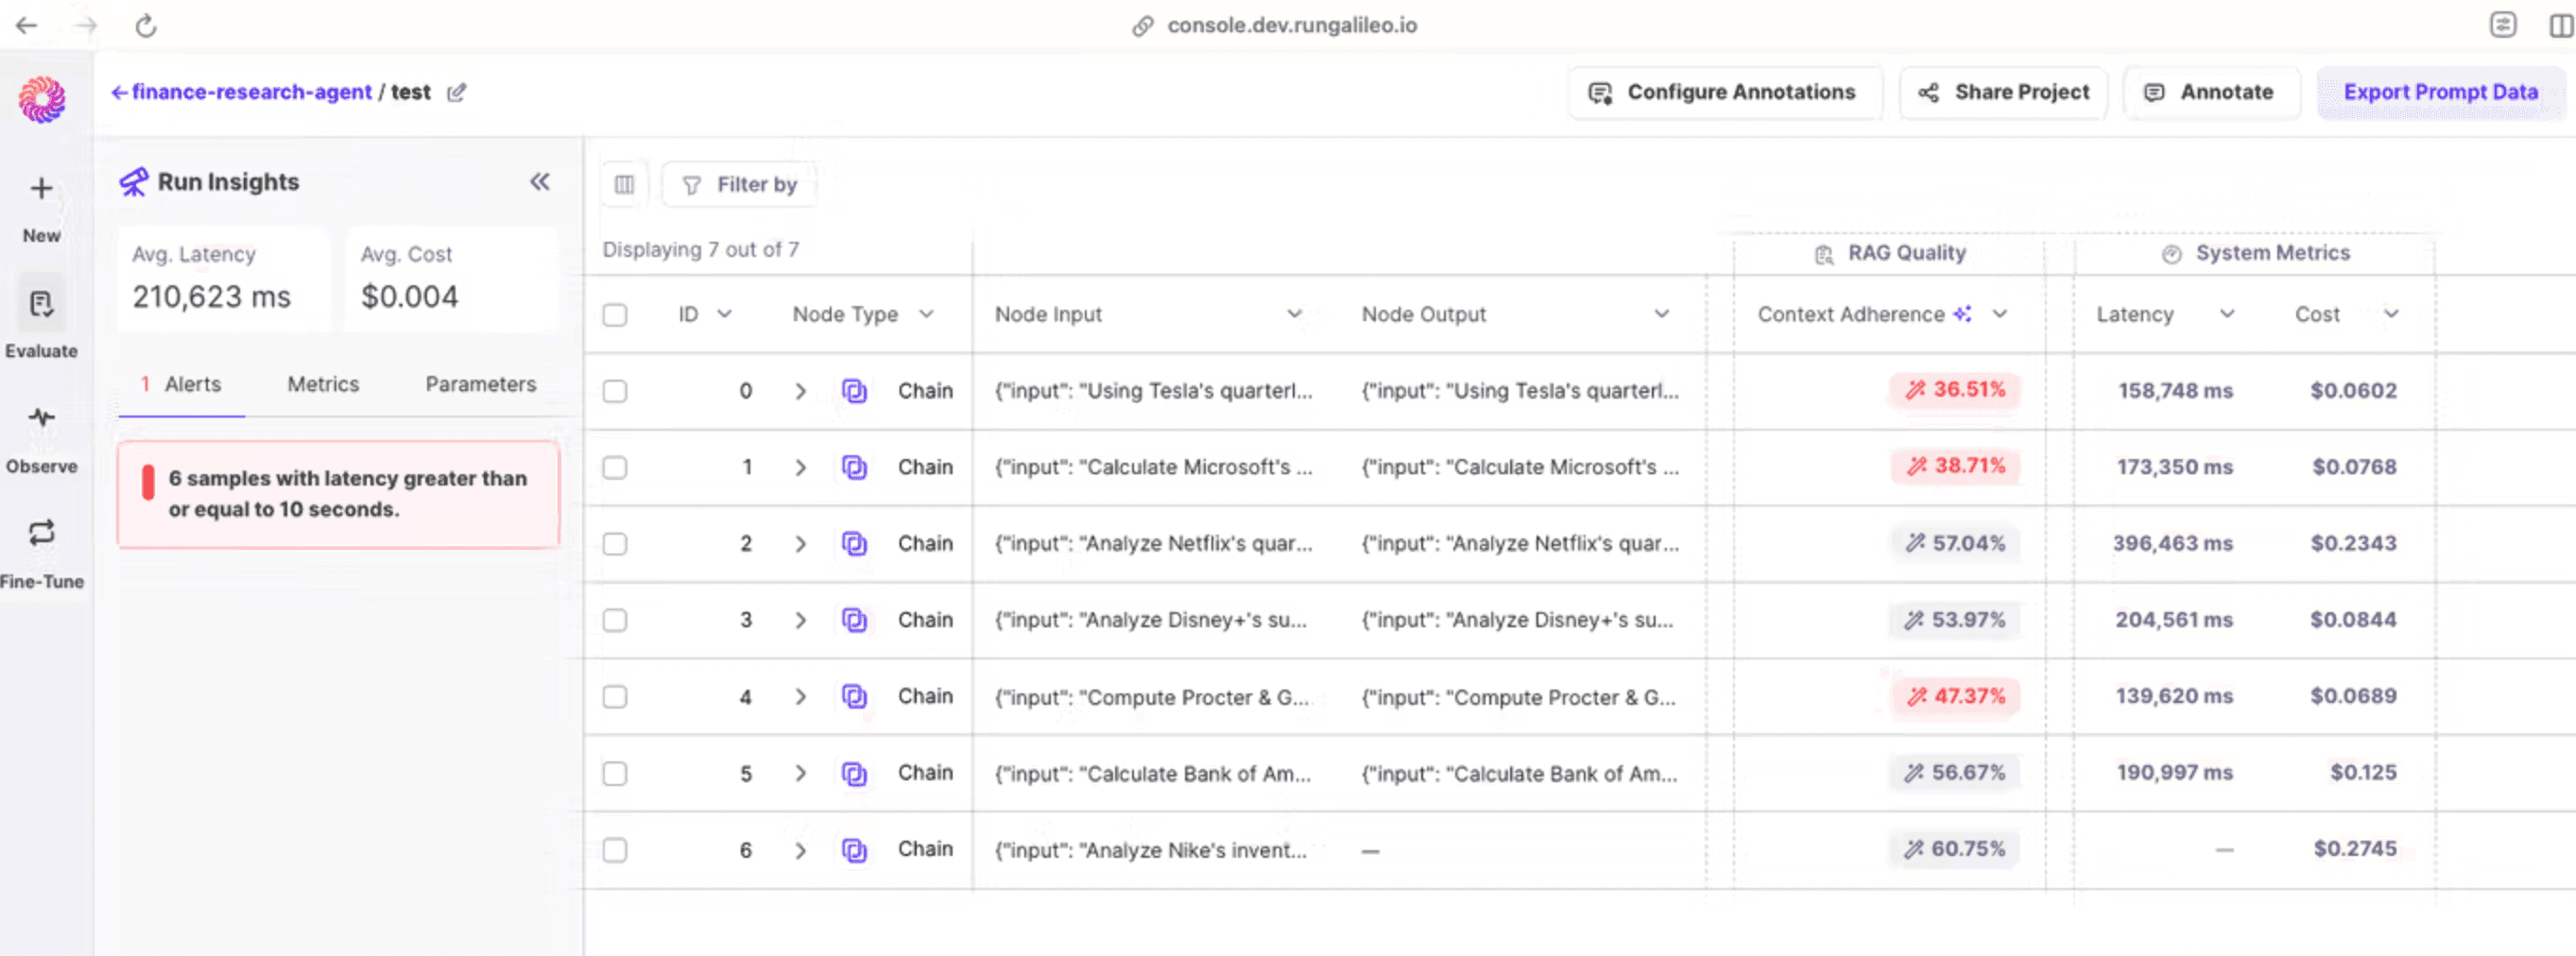
Let's go inside the test run to see agent executions. The dashboard reveals seven different research queries that our agent processed. Each query focused on analyzing different companies' financial metrics. Here's what we can observe:
The agent shows varying performance across different samples
There's an alert noting that six samples had latency greater than 10 seconds, which suggests room for optimization.
Average Latency for run: 210,623 ms
Average Cost for run: $0.004 per execution
This detailed view helps us understand where the agent performs well and where it might need improvements in terms of speed and accuracy.
Looking at the trace view, we can see a detailed breakdown of an execution chain where the context adherence was notably low at 33.33%. The system explanation helps us understand why:
"The response has a 33.33% chance of being consistent with the context. Based on the analysis, while some of the figures like those for later 2022 and 2023 are supported by document references (such as Q3 2023 and Q4 2023), many earlier quarters' figures lack direct evidence from the documents or explicit mentions, leading to incomplete support for claims."

This reveals two key issues in our agent's performance:
The agent is citing recent data (2022-2023) correctly with proper sources
However, it's making claims about earlier data without proper documentation or references
To improve this, we have two main paths:
Improve the retrieval system:
Ensure we're gathering sufficient historical data
Expand the search scope to include earlier quarterly reports
Better source verification for historical data
Enhance the prompts:
Add explicit instructions to cite sources for all numerical claims
Include requirements to clearly distinguish between verified and unverified data
Add checks for data completeness before making comparisons
Now, let's look at the tool selection quality metric. Over here, it checked the content of previous iterations, the tool selected, the argument to the tool and concluded with the explanation that the tool call was justified and correct. If the tool selection is incorrect, we can use the explanation to add criteria in the prompt of the agent to fix such issues.
This kind of debugging insight is needed for iteratively improving our agent's reliability and efficiency. Agents fail a lot in many ways and only with such granular insights we can improve them.
Conclusion
Testing our deep research agent taught us something important - an AI is only as good as our ability to check its work. By looking closely at how our agent performed, we could see exactly what it did well (like finding recent data quickly) and what it struggled with (like backing up older numbers with proper sources). Our evaluation helped us spot these issues easily, showing us where to improve the agent.
Just like a new team member, an AI agent needs careful monitoring and feedback to improve. The key isn't just building the agent! It's watching how it works and making it better over time. Learn more about our state-of-the-art evaluation capabilities by chatting with our team.
2025 has started with a bang. The arms race has begun with China entering the landscape and shaking up the order with their R1.
Now that frontier LLM play is getting harder; the wrapper value capture has begun - first with ChatGPT and now with Deep Research - an agent that can conduct comprehensive internet research in minutes instead of hours by sifting through lots of webpages. It is exciting to see these capabilities, but we believe the real value comes from understanding how to build and customize these systems for enterprise applications.
Rather than just being users of AI agents, let's roll up our sleeves and create our own research agent using o3-mini for generation and 4o for evaluation. By building one focused on financial research, we'll learn the core principles that power tools like deep research - from advanced reasoning and web browsing to synthesizing information from diverse sources.
We will develop an agent that can understand problems, make research plans, take action across multiple steps, and evaluate its findings. Think of it as looking under the hood of these new AI system patterns so we can adapt and improve them for our bespoke needs.
Get full example code - https://github.com/rungalileo/blog-examples
Requirements
Let's get started by installing these dependencies in a Python 3.11 environment with this command.
pip install --quiet langgraph==0.2.56 langchain-community==0.3.9 langchain-openai==0.2.11 tavily-python==0.5.0 promptquality==1.1.0
Signup on Tavily and OpenAI to generate an API key. Save the keys in a .env file as shown below.
OPENAI_API_KEY=KKK
TAVILY_API_KEY=KKK
Defining the problem
Our goal is to build a financial research agent which can go through multiple iterations of research to get the final answer. We’ll create a workflow that receives a question, breaks it down into granular questions, searches the web using Tavily, and analyzes the results. It then rechecks the output to create further plan. It does this a few times till the goal is achieved.
To analyze the results, we'll use the ReAct agent, which works with the Tavily API to think through and act on problems.
Define the ReAct agent
Within your IDE of choice, create a new Jupyter notebook agent.ipynb.
We will import a prebuilt ReAct agent along with web search tool called Tavily. While we'll use the same agent for all steps in this example, you could use different agents for different tasks. The best part? This can be further customized in later examples.
from langchain_openai import ChatOpenAI
from langchain_community.tools.tavily_search import TavilySearchResults
from langgraph.prebuilt import create_react_agent

system_prompt = "You are a helpful finance expert named Fred in year 2024. First of all you create a plan to get answer to the research query. Then you use tools to get answers to the questions. Finally you use the answers to each question in the plan to give your final verdict."

llm = ChatOpenAI(model="o3-mini")
tools = [TavilySearchResults(max_results=10)]
agent_executor = create_react_agent(llm, tools, state_modifier=system_prompt)
State management
Now let's talk about how our agent keeps track of everything it needs to do. Think of it like a smart to-do list system with three main parts.
First, we need a way to track what the agent plans to do. We'll use a simple list of steps written as text strings. This is like having a checklist of tasks the agent needs to complete.
Second, we want to remember what the agent has already done and what happened with each task. For this, we'll use a list of pairs (or tuples in programming terms). Each pair contains both the action taken and what resulted from that action.
Lastly, we need to store two more important pieces of information: the original question that was asked (the input) and the final answer once the agent finishes its work (the response).
This setup gives our agent everything it needs to work effectively!
import operator
from pydantic import BaseModel, Field
from typing import Annotated, List, Tuple
from typing_extensions import TypedDict

class PlanExecute(TypedDict):
    input: str
    plan: List[str]
    past_steps: Annotated[List[Tuple], operator.add]
    response: str


class Plan(BaseModel):
    """Plan to follow in future"""

    steps: List[str] = Field(
        description="different steps to follow, should be in sorted order"
    )
Plan step
The planning step is where our agent will begin to tackle a research question. We'll use a special feature called function calling to create this plan. Let's break down how it works.
First, we create a template for how our agent should think. We tell it that it's a finance research agent working in October 2024, and its job is to break down big questions into smaller, manageable steps. This template, called planner_prompt, gives our agent clear instructions: create a simple, step-by-step plan where each step leads logically to the next, and make sure ano steps are missing or unnecessary. The final step should give us our answer.
The code sets this up by using ChatPromptTemplate, which has two main parts:
A system message that explains the agent's role and how it should plan
A placeholder for the messages we'll send it
from langchain_core.prompts import ChatPromptTemplate

planner_prompt = ChatPromptTemplate.from_messages(
    [
        (
            "system",
            """You are a finance research agent working in Oct 2024. For the given objective, come up with a simple step by step plan. \
This plan should involve individual tasks, that if executed correctly will yield the correct answer. Do not add any superfluous steps. The result of the final step should be the final answer. Make sure that each step has all the information needed - do not skip steps. At the end use the info collected to give the final answer to the main question containing the facts.""",
        ),
        ("placeholder", "{messages}"),
    ]
)
We then connect this template to ChatOpenAI using o3-mini. We take o3-mini being a decent reasoning tool calling model at low cost. The "structured output" part means the plan will come out in a specific format we can easily work with. You can also go ahead with any top model from our Agent Leaderboard ranking.
When we test it with a real question like "Should we invest in Tesla given the current situation of EV?", the agent will create a detailed plan for researching this investment decision. Each step will help gather the information needed to make an informed recommendation about Tesla stock based on the current electric vehicle market conditions.
Think of it like creating a research roadmap. We're giving our agent the tools and guidelines it needs to break down complex questions into manageable research tasks.
planner = planner_prompt | ChatOpenAI(
    model="o3-mini").with_structured_output(Plan)

planner.invoke(
    {
        "messages": [
            ("user", "Should we invest in Tesla given the current situation of EV?")
        ]
    }
)
Replan step
Think of re-planning as the agent's ability to adjust its strategy based on what it has already learned. This is similar to how we might revise our research approach after discovering new information. Let's break down how this works.
First, we create two types of possible actions the agent can take:
Response: When the agent has enough information to answer the user's question
Plan: When the agent needs to do more research to get a complete answer
The re-planning prompt is like giving our agent a structured way to think about what to do next. It looks at three things:
The original question (objective)
The initial plan it made
What steps have already been completed and what was learned
Using this information, the agent can decide to either:
Create new steps to gather more needed information
Give a final answer if it has enough information
The clever part is that the agent won't repeat steps it's already done. It focuses only on what still needs to be investigated. This makes the research process more efficient and prevents redundant work. It's like having a research assistant who can intelligently adjust their approach based on what they've already discovered.
This process helps our agent stay focused and efficient, only pursuing new information when needed and knowing when it's time to provide a final answer to the user.
We connect this re-planning ability to o3-mini as we expect it to be great at evaluation and planning.
from typing import Union


class Response(BaseModel):
    """Response to user."""

    response: str


class Act(BaseModel):
    """Action to perform."""

    action: Union[Response, Plan] = Field(
        description="Action to perform. If you want to respond to user, use Response. "
        "If you need to further use tools to get the answer, use Plan."
    )


replanner_prompt = ChatPromptTemplate.from_template(
    """For the given objective, come up with a simple step by step plan. \
This plan should involve individual tasks, that if executed correctly will yield the correct answer. Do not add any superfluous steps. \
The result of the final step should be the final answer. Make sure that each step has all the information needed - do not skip steps.

Your objective was this:
{input}

Your original plan was this:
{plan}

You have currently done the follow steps:
{past_steps}

Update your plan accordingly. If no more steps are needed and you can return to the user, then respond with that. Otherwise, fill out the plan. Only add steps to the plan that still NEED to be done. Do not return previously done steps as part of the plan."""
)


replanner = replanner_prompt | ChatOpenAI(
    model="o3-mini").with_structured_output(Act)
Define nodes
Think of this graph as a roadmap that shows how our agent moves from one task to another. We have three main functions that work together:
The execute_step function handles individual tasks. It takes the first item from our plan, formats it properly, and has the agent work on it. It's like giving a specific assignment to a research assistant and getting back their findings. The agent keeps track of what it did and what it learned.
The plan_step function is where everything begins. When given a question, it creates the initial research plan. This is like creating a first draft of how to tackle the problem.
The replan_step function is where the agent decides what to do next. After completing a task, it looks at what it has learned and either:
Creates new steps if more research is needed
Provides a final answer if it has enough information
Finally, we have the should_end function, which works like a checkpoint. It checks if we have a final answer ready. If we do, it ends the process. If not, it tells the agent to continue working.
from typing import Literal
from langgraph.graph import END


async def execute_step(state: PlanExecute):
    plan = state["plan"]
    plan_str = "\n".join(f"{i+1}. {step}" for i, step in enumerate(plan))
    task = plan[0]
    task_formatted = f"""For the following plan:
{plan_str}\n\nYou are tasked with executing step {1}, {task}."""
    agent_response = await agent_executor.ainvoke(
        {"messages": [("user", task_formatted)]}
    )
    return {
        "past_steps": [(task, agent_response["messages"][-1].content)],
    }


async def plan_step(state: PlanExecute):
    plan = await planner.ainvoke({"messages": [("user", state["input"])]})
    return {"plan": plan.steps}


async def replan_step(state: PlanExecute):
    output = await replanner.ainvoke(state)
    if isinstance(output.action, Response):
        return {"response": output.action.response}
    else:
        return {"plan": output.action.steps}


def should_end(state: PlanExecute):
    if "response" in state and state["response"]:
        return END
    else:
        return "agent"
Define workflow
We use StateGraph to create a map that guides our agent through its research journey via different actions it can take. Here's how it flows:
First, we create the basic structure of the workflow with its three main stops:
A planning station ("planner")
A research station ("agent")
A reviewing station ("replan")
Then we connect these stations in a logical order:
Everything starts at the planning station
From planning, the agent moves to doing research
After research, it goes to reviewing what it learned
At the reviewing station, the agent makes an important decision:
Either continue with more research if needed
Or finish up if it has a complete answer
This creates a smooth cycle where the agent can keep researching until it has everything it needs to answer the original question. It's like having a smart research assistant who knows when to dig deeper and when they've found enough information.
Finally, we compile this workflow into something we can easily use, just like any other tool in our system. This makes our research agent ready to tackle real questions and provide thorough, well-researched answers.
from langgraph.graph import StateGraph, START

workflow = StateGraph(PlanExecute)

# Add the plan node
workflow.add_node("planner", plan_step)

# Add the execution step
workflow.add_node("agent", execute_step)

# Add a replan node
workflow.add_node("replan", replan_step)

workflow.add_edge(START, "planner")

# From plan we go to agent
workflow.add_edge("planner", "agent")

# From agent, we replan
workflow.add_edge("agent", "replan")

workflow.add_conditional_edges(
    "replan",
    # Next, we pass in the function that will determine which node is called next.
    should_end,
    ["agent", END],
)

# Finally, we compile it!
# This compiles it into a LangChain Runnable,
# meaning you can use it as you would any other runnable
app = workflow.compile()
We can visualize the agent workflow with a mermaid diagram.
from IPython.display import Image, display

display(Image(app.get_graph(xray=True).draw_mermaid_png()))
We create a LLM judge to evaluate how well our agent performs. The inbuilt scorers make it super easy to setup one for us. We use gpt-4o as our LLM for the Tool Selection Quality and context adherence metric, with three evaluations per response to ensure great evaluation accuracy.
The tool selection quality metric is responsible checking if tool selection was necessary and if yes, then did LLM chose the righ arguments for the tool call. On the other side, context adherence scorer measures how well the agent sticks to the context and provides relevant information.
context_adherence_scorer = pq.CustomizedChainPollScorer(
                        scorer_name=pq.CustomizedScorerName.context_adherence_plus,
                        model_alias=pq.Models.gpt_4o,
                        num_judges=3)

tool_selection_scorer = pq.CustomizedChainPollScorer(
                scorer_name=pq.CustomizedScorerName.tool_selection_quality,
                model_alias=pq.Models.gpt_4o,
            )
We then set up Galileo evaluation callback that will track and record our agent's performance. It's like having a quality control system that monitors our research process.
With just few lines of code we will be able to get all the information needed to visualise and debug the traces.
evaluate_handler = pq.GalileoPromptCallback(project_name='deep-research-agent', run_name='v1', scorers=[pq.Scorers.tool_errors_plus, tool_selection_scorer, context_adherence_scorer])
We then run our agent with a specific test question. The system will process this question through our research workflow we built earlier.
The code is set up to show us what's happening at each step (that's what the async for loop does). It will print out each action and result as they happen, letting us watch the research process in real time.
Finally, we close out our evaluation session with evaluate_handler.finish(). This saves all the performance data we collected during the run to the Galileo Evaluate console so we can see the chain visualisation and the agent metrics.
Next, we set some basic config for our agent:
It can't go through more than 30 cycles (recursion_limit)
It must use our evaluation system (callbacks)
Now we are ready to run the experiment!
inputs = {"input": "Should we invest in Tesla given the current situation of EV?"}

config = {"recursion_limit": 40, "callbacks": [evaluate_handler]}

async for event in app.astream(inputs, config=config):
    for k, v in event.items():
        if k != "__end__":
            print(v)

evaluate_handler.finish()
Experiment results and metrics
We ran several experiments to evaluate our research agent's performance, and the results are quite revealing. Looking at our project dashboard, we can see how different test runs performed based on key metrics.
The standout performer was test-3, which earned the top rank with impressive results. It achieved a strong context adherence score of 0.844, meaning it stayed highly relevant to the research questions. What's particularly notable is its speed - completing tasks in just 84,039 milliseconds, making it the fastest among all runs. The agent processed three responses during this run, all while keeping costs low at $0.0025 per run.
The other test runs showed interesting variations in performance. Response times ranged from 134,000 to 228,000 milliseconds, and context adherence scores fell between 0.501 and 0.855. While some runs, like the initial test, produced more responses (up to 7), others generated just one. Cost efficiency remained consistent across all runs, staying between $0.002 and $0.004 per run.
These results give us valuable insights into our agent's capabilities and help us identify the most effective configuration for future research tasks.
Let's go inside the test run to see agent executions. The dashboard reveals seven different research queries that our agent processed. Each query focused on analyzing different companies' financial metrics. Here's what we can observe:
The agent shows varying performance across different samples
There's an alert noting that six samples had latency greater than 10 seconds, which suggests room for optimization.
Average Latency for run: 210,623 ms
Average Cost for run: $0.004 per execution
This detailed view helps us understand where the agent performs well and where it might need improvements in terms of speed and accuracy.
Looking at the trace view, we can see a detailed breakdown of an execution chain where the context adherence was notably low at 33.33%. The system explanation helps us understand why:
"The response has a 33.33% chance of being consistent with the context. Based on the analysis, while some of the figures like those for later 2022 and 2023 are supported by document references (such as Q3 2023 and Q4 2023), many earlier quarters' figures lack direct evidence from the documents or explicit mentions, leading to incomplete support for claims."
This reveals two key issues in our agent's performance:
The agent is citing recent data (2022-2023) correctly with proper sources
However, it's making claims about earlier data without proper documentation or references
To improve this, we have two main paths:
Improve the retrieval system:
Ensure we're gathering sufficient historical data
Expand the search scope to include earlier quarterly reports
Better source verification for historical data
Enhance the prompts:
Add explicit instructions to cite sources for all numerical claims
Include requirements to clearly distinguish between verified and unverified data
Add checks for data completeness before making comparisons
Now, let's look at the tool selection quality metric. Over here, it checked the content of previous iterations, the tool selected, the argument to the tool and concluded with the explanation that the tool call was justified and correct. If the tool selection is incorrect, we can use the explanation to add criteria in the prompt of the agent to fix such issues.
This kind of debugging insight is needed for iteratively improving our agent's reliability and efficiency. Agents fail a lot in many ways and only with such granular insights we can improve them.
Conclusion
Testing our deep research agent taught us something important - an AI is only as good as our ability to check its work. By looking closely at how our agent performed, we could see exactly what it did well (like finding recent data quickly) and what it struggled with (like backing up older numbers with proper sources). Our evaluation helped us spot these issues easily, showing us where to improve the agent.
Just like a new team member, an AI agent needs careful monitoring and feedback to improve. The key isn't just building the agent! It's watching how it works and making it better over time. Learn more about our state-of-the-art evaluation capabilities by chatting with our team.

Pratik Bhavsar